在程序设计领域,GoF 的 23 种设计模式堪称经典中的经典。无论是创建型、结构型还是行为型模式,每种都蕴含着解决特定编程问题的智慧。对于技术人员来说,掌握这些模式,就如同手握利刃,能在复杂的代码世界中披荆斩棘,提升代码的可维护性、可扩展性与复用性。本文将从模式名称、概念、问题、解决方案及实现代码这几个关键维度,全方位剖析这 23 种设计模式,助你快速精通,进阶为设计模式高手。
一、创建型模式
创建型模式对类的实例化过程(即对象的创建过程)进行了抽象,能够使软件模块做到与 对象的创建和组织无关。创建型模式隐藏了对象是如何被创建和组合在一起的,以达到使整个 系统独立的目的。
创建型模式包括:工厂方法模式、抽象工厂模式、原型模式、单例模式和建造者模式等。
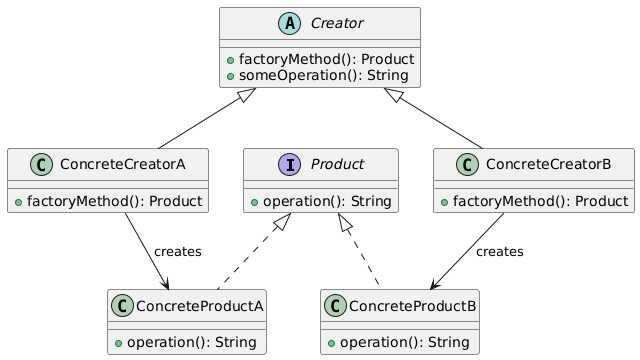
1. 工厂方法模式 (Factory Method)
概念:定义一个创建对象的接口,但让子类决定实例化哪一个类。工厂方法使一个类的实例化延迟到其子类。
问题:需要创建对象,但不希望指定具体的类,以增加灵活性。
解决方案:定义一个工厂方法接口,让子类实现这个方法来创建对象。
UML图:
实现代码:
1
2
3
4
5
6
7
8
9
10
11
12
13
14
15
16
17
18
19
20
21
22
23
24
25
26
27
28
29
30
31
32
33
34
35
36
37
38
39
40
41
42
|
interface Product {
String operation();
}
class ConcreteProductA implements Product {
public String operation() {
return "Result of ConcreteProductA";
}
}
class ConcreteProductB implements Product {
public String operation() {
return "Result of ConcreteProductB";
}
}
abstract class Creator {
public abstract Product factoryMethod();
public String someOperation() {
Product product = factoryMethod();
return "Creator: " + product.operation();
}
}
class ConcreteCreatorA extends Creator {
public Product factoryMethod() {
return new ConcreteProductA();
}
}
class ConcreteCreatorB extends Creator {
public Product factoryMethod() {
return new ConcreteProductB();
}
}
|
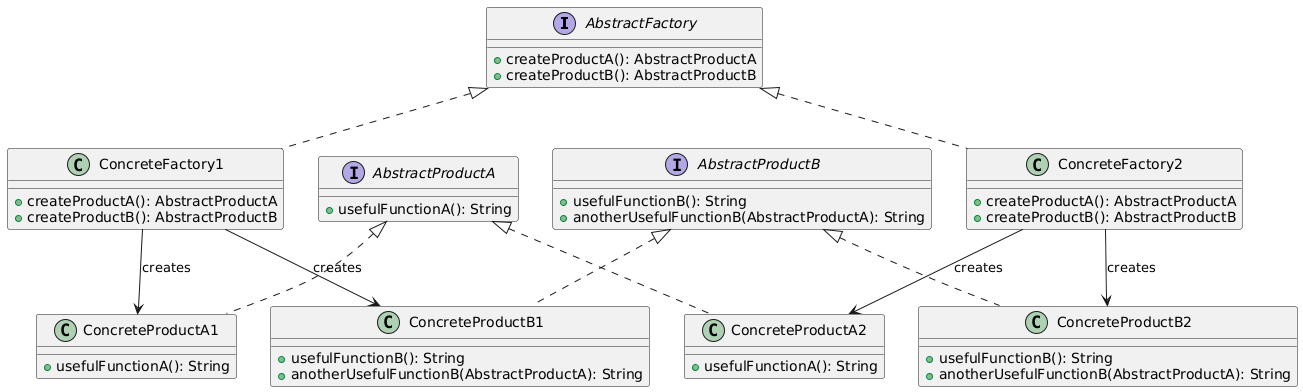
2. 抽象工厂模式 (Abstract Factory)
1
2
3
4
5
6
7
8
9
10
11
12
13
14
15
16
17
18
19
20
21
22
23
24
25
26
27
28
29
30
31
32
33
34
35
36
37
38
39
40
41
42
43
44
45
46
47
48
49
50
51
52
53
54
55
56
57
58
59
60
61
62
63
64
65
|
interface Button {
void paint();
}
interface Checkbox {
void paint();
}
class WinButton implements Button {
public void paint() {
System.out.println("Windows Button");
}
}
class MacButton implements Button {
public void paint() {
System.out.println("Mac Button");
}
}
class WinCheckbox implements Checkbox {
public void paint() {
System.out.println("Windows Checkbox");
}
}
class MacCheckbox implements Checkbox {
public void paint() {
System.out.println("Mac Checkbox");
}
}
interface GUIFactory {
Button createButton();
Checkbox createCheckbox();
}
class WinFactory implements GUIFactory {
public Button createButton() {
return new WinButton();
}
public Checkbox createCheckbox() {
return new WinCheckbox();
}
}
class MacFactory implements GUIFactory {
public Button createButton() {
return new MacButton();
}
public Checkbox createCheckbox() {
return new MacCheckbox();
}
}
|
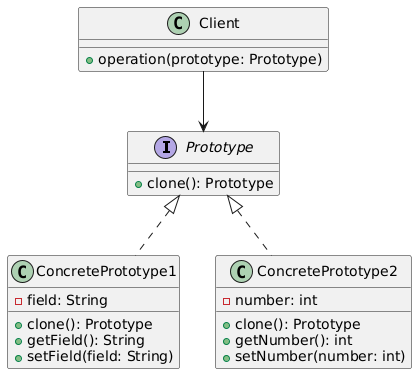
3. 原型模式 (Prototype)
1
2
3
4
5
6
7
8
9
10
11
12
13
14
15
16
17
18
19
20
21
22
23
24
25
26
27
28
29
30
31
32
33
34
35
36
37
38
39
40
41
42
43
44
45
46
47
48
|
interface Prototype {
Prototype clone();
String getDetails();
}
class ConcretePrototype implements Prototype {
private String name;
private int value;
public ConcretePrototype(String name, int value) {
this.name = name;
this.value = value;
}
public ConcretePrototype(ConcretePrototype prototype) {
this.name = prototype.name;
this.value = prototype.value;
}
public Prototype clone() {
return new ConcretePrototype(this);
}
public String getDetails() {
return "Name: " + name + ", Value: " + value;
}
public void setValue(int value) {
this.value = value;
}
}
class PrototypeRegistry {
private Map<String, Prototype> prototypes = new HashMap<>();
public void addPrototype(String key, Prototype prototype) {
prototypes.put(key, prototype);
}
public Prototype getClone(String key) {
Prototype prototype = prototypes.get(key);
return prototype != null ? prototype.clone() : null;
}
}
|
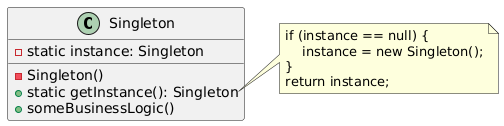
4. 单例模式 (Singleton)
概念:确保一个类只有一个实例,并提供一个全局访问点。
问题:需要确保一个类只有一个实例,并控制对其的访问。
解决方案:将构造函数私有化,提供一个静态方法获取唯一实例。
UML图:
实现代码:
1
2
3
4
5
6
7
8
9
10
11
12
13
14
15
16
17
18
19
20
21
22
23
24
25
26
27
28
29
30
31
32
33
34
35
36
37
38
39
40
41
42
43
44
45
46
47
48
49
50
|
class Singleton {
private static volatile Singleton instance;
private String value;
private Singleton(String value) {
this.value = value;
}
public static Singleton getInstance(String value) {
if (instance == null) {
synchronized (Singleton.class) {
if (instance == null) {
instance = new Singleton(value);
}
}
}
return instance;
}
public String getValue() {
return value;
}
public void someBusinessLogic() {
System.out.println("Executing business logic with value: " + value);
}
}
enum EnumSingleton {
INSTANCE;
private String value;
public void setValue(String value) {
this.value = value;
}
public String getValue() {
return value;
}
public void doSomething() {
System.out.println("Doing something with value: " + value);
}
}
|
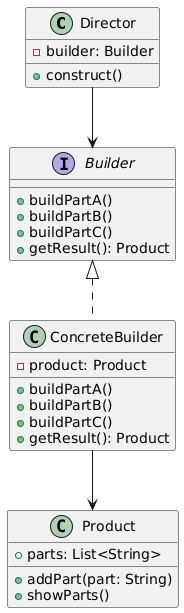
5. 建造者模式 (Builder)
概念:将一个复杂对象的构建与其表示分离,使得同样的构建过程可以创建不同的表示。
问题:需要创建复杂对象,但构造过程可能涉及多个步骤或参数。
解决方案:使用建造者类来逐步构建对象,最后返回完整对象。
UML图:
实现代码:
1
2
3
4
5
6
7
8
9
10
11
12
13
14
15
16
17
18
19
20
21
22
23
24
25
26
27
28
29
30
31
32
33
34
35
36
37
38
39
40
41
42
43
44
45
46
47
48
49
50
51
52
53
54
55
56
57
58
59
60
61
62
63
64
65
66
67
68
69
70
71
72
73
74
75
76
77
78
79
80
81
82
|
class Computer {
private String CPU;
private String RAM;
private String storage;
private String GPU;
public Computer() {}
public void setCPU(String CPU) { this.CPU = CPU; }
public void setRAM(String RAM) { this.RAM = RAM; }
public void setStorage(String storage) { this.storage = storage; }
public void setGPU(String GPU) { this.GPU = GPU; }
@Override
public String toString() {
return "Computer [CPU=" + CPU + ", RAM=" + RAM +
", Storage=" + storage + ", GPU=" + GPU + "]";
}
}
interface ComputerBuilder {
void buildCPU();
void buildRAM();
void buildStorage();
void buildGPU();
Computer getComputer();
}
class GamingComputerBuilder implements ComputerBuilder {
private Computer computer;
public GamingComputerBuilder() {
this.computer = new Computer();
}
public void buildCPU() {
computer.setCPU("Intel i9");
}
public void buildRAM() {
computer.setRAM("32GB DDR4");
}
public void buildStorage() {
computer.setStorage("1TB SSD + 2TB HDD");
}
public void buildGPU() {
computer.setGPU("NVIDIA RTX 4080");
}
public Computer getComputer() {
return computer;
}
}
class ComputerDirector {
public void construct(ComputerBuilder builder) {
builder.buildCPU();
builder.buildRAM();
builder.buildStorage();
builder.buildGPU();
}
}
class BuilderExample {
public static void main(String[] args) {
ComputerDirector director = new ComputerDirector();
ComputerBuilder builder = new GamingComputerBuilder();
director.construct(builder);
Computer computer = builder.getComputer();
System.out.println(computer);
}
}
|
二、结构型模式
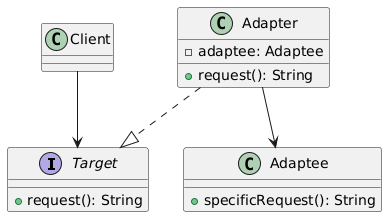
6. 适配器模式 (Adapter)
概念:将一个类的接口转换成客户期望的另一个接口,使接口不兼容的类可以一起工作。
问题:需要使用现有的类,但其接口与需要的接口不匹配。
解决方案:创建适配器类,实现目标接口并包装被适配者。
UML图:
实现代码:
1
2
3
4
5
6
7
8
9
10
11
12
13
14
15
16
17
18
19
20
21
22
23
24
25
26
27
28
29
30
31
32
33
34
35
36
37
38
39
40
41
42
43
44
45
46
47
48
49
50
51
52
53
54
55
56
57
58
59
60
61
62
63
64
65
66
67
68
|
interface MediaPlayer {
void play(String audioType, String fileName);
}
interface AdvancedMediaPlayer {
void playVlc(String fileName);
void playMp4(String fileName);
}
class VlcPlayer implements AdvancedMediaPlayer {
public void playVlc(String fileName) {
System.out.println("Playing vlc file: " + fileName);
}
public void playMp4(String fileName) {
}
}
class Mp4Player implements AdvancedMediaPlayer {
public void playVlc(String fileName) {
}
public void playMp4(String fileName) {
System.out.println("Playing mp4 file: " + fileName);
}
}
class MediaAdapter implements MediaPlayer {
private AdvancedMediaPlayer advancedMusicPlayer;
public MediaAdapter(String audioType) {
if (audioType.equalsIgnoreCase("vlc")) {
advancedMusicPlayer = new VlcPlayer();
} else if (audioType.equalsIgnoreCase("mp4")) {
advancedMusicPlayer = new Mp4Player();
}
}
public void play(String audioType, String fileName) {
if (audioType.equalsIgnoreCase("vlc")) {
advancedMusicPlayer.playVlc(fileName);
} else if (audioType.equalsIgnoreCase("mp4")) {
advancedMusicPlayer.playMp4(fileName);
}
}
}
class AudioPlayer implements MediaPlayer {
private MediaAdapter mediaAdapter;
public void play(String audioType, String fileName) {
if (audioType.equalsIgnoreCase("mp3")) {
System.out.println("Playing mp3 file: " + fileName);
} else if (audioType.equalsIgnoreCase("vlc") ||
audioType.equalsIgnoreCase("mp4")) {
mediaAdapter = new MediaAdapter(audioType);
mediaAdapter.play(audioType, fileName);
} else {
System.out.println("Invalid media type: " + audioType);
}
}
}
|
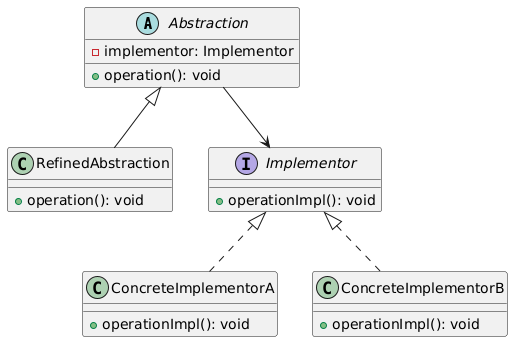
7. 桥接模式 (Bridge)
1
2
3
4
5
6
7
8
9
10
11
12
13
14
15
16
17
18
19
20
21
22
23
24
25
26
27
28
29
30
31
32
33
34
35
36
37
38
39
40
41
42
43
44
45
46
47
48
49
50
51
52
53
54
55
56
57
58
59
60
61
62
63
64
65
66
67
68
69
70
71
72
73
74
75
76
77
78
79
80
81
82
83
84
85
|
interface Device {
boolean isEnabled();
void enable();
void disable();
int getVolume();
void setVolume(int percent);
int getChannel();
void setChannel(int channel);
}
class TV implements Device {
private boolean on = false;
private int volume = 30;
private int channel = 1;
public boolean isEnabled() { return on; }
public void enable() { on = true; }
public void disable() { on = false; }
public int getVolume() { return volume; }
public void setVolume(int volume) { this.volume = volume; }
public int getChannel() { return channel; }
public void setChannel(int channel) { this.channel = channel; }
}
class Radio implements Device {
private boolean on = false;
private int volume = 50;
private int channel = 1;
public boolean isEnabled() { return on; }
public void enable() { on = true; }
public void disable() { on = false; }
public int getVolume() { return volume; }
public void setVolume(int volume) { this.volume = volume; }
public int getChannel() { return channel; }
public void setChannel(int channel) { this.channel = channel; }
}
abstract class RemoteControl {
protected Device device;
public RemoteControl(Device device) {
this.device = device;
}
abstract void togglePower();
abstract void volumeUp();
abstract void volumeDown();
abstract void channelUp();
abstract void channelDown();
}
class BasicRemote extends RemoteControl {
public BasicRemote(Device device) {
super(device);
}
public void togglePower() {
if (device.isEnabled()) {
device.disable();
} else {
device.enable();
}
}
public void volumeUp() {
device.setVolume(device.getVolume() + 10);
}
public void volumeDown() {
device.setVolume(device.getVolume() - 10);
}
public void channelUp() {
device.setChannel(device.getChannel() + 1);
}
public void channelDown() {
device.setChannel(device.getChannel() - 1);
}
}
|
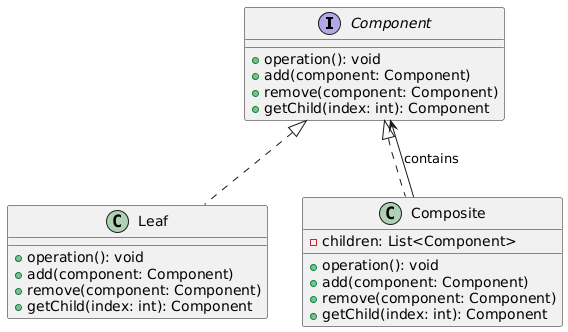
8. 组合模式 (Composite)
概念:将对象组合成树形结构以表示”部分-整体”的层次结构,使得用户对单个对象和组合对象的使用具有一致性。
问题:需要处理树形结构数据,且希望对叶子节点和复合节点进行统一处理。
解决方案:定义统一的组件接口,让叶子节点和复合节点都实现该接口。
UML图:
实现代码:
1
2
3
4
5
6
7
8
9
10
11
12
13
14
15
16
17
18
19
20
21
22
23
24
25
26
27
28
29
30
31
32
33
34
35
36
37
38
39
40
41
42
43
44
45
46
47
48
49
50
51
52
53
54
55
56
57
|
interface FileSystemComponent {
void showDetails();
long getSize();
}
class File implements FileSystemComponent {
private String name;
private long size;
public File(String name, long size) {
this.name = name;
this.size = size;
}
public void showDetails() {
System.out.println("File: " + name + " (" + size + " bytes)");
}
public long getSize() {
return size;
}
}
class Directory implements FileSystemComponent {
private String name;
private List<FileSystemComponent> components = new ArrayList<>();
public Directory(String name) {
this.name = name;
}
public void addComponent(FileSystemComponent component) {
components.add(component);
}
public void removeComponent(FileSystemComponent component) {
components.remove(component);
}
public void showDetails() {
System.out.println("Directory: " + name);
for (FileSystemComponent component : components) {
component.showDetails();
}
}
public long getSize() {
long totalSize = 0;
for (FileSystemComponent component : components) {
totalSize += component.getSize();
}
return totalSize;
}
}
|
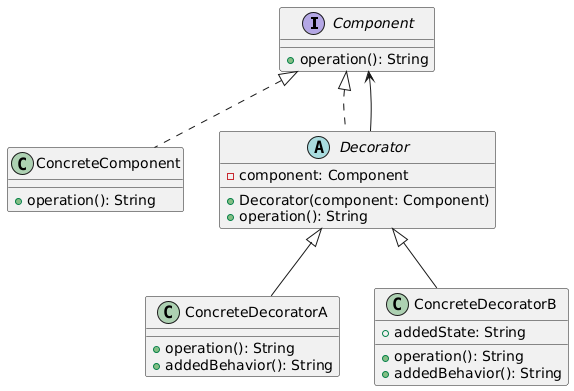
9. 装饰器模式 (Decorator)
概念:动态地给一个对象添加一些额外的职责,就增加功能来说,装饰器模式比生成子类更为灵活。
问题:需要在不修改现有代码的情况下,动态地给对象添加功能。
解决方案:创建装饰器类,包装原始对象并提供额外的功能。
UML图:
实现代码:
1
2
3
4
5
6
7
8
9
10
11
12
13
14
15
16
17
18
19
20
21
22
23
24
25
26
27
28
29
30
31
32
33
34
35
36
37
38
39
40
41
42
43
44
45
46
47
48
49
50
51
52
53
54
55
56
57
58
59
60
61
62
63
64
65
66
67
68
69
70
71
72
73
74
75
76
|
interface Coffee {
double getCost();
String getDescription();
}
class SimpleCoffee implements Coffee {
public double getCost() {
return 1.0;
}
public String getDescription() {
return "Simple coffee";
}
}
abstract class CoffeeDecorator implements Coffee {
protected Coffee decoratedCoffee;
public CoffeeDecorator(Coffee coffee) {
this.decoratedCoffee = coffee;
}
public double getCost() {
return decoratedCoffee.getCost();
}
public String getDescription() {
return decoratedCoffee.getDescription();
}
}
class MilkDecorator extends CoffeeDecorator {
public MilkDecorator(Coffee coffee) {
super(coffee);
}
public double getCost() {
return super.getCost() + 0.5;
}
public String getDescription() {
return super.getDescription() + ", with milk";
}
}
class SugarDecorator extends CoffeeDecorator {
public SugarDecorator(Coffee coffee) {
super(coffee);
}
public double getCost() {
return super.getCost() + 0.2;
}
public String getDescription() {
return super.getDescription() + ", with sugar";
}
}
class WhippedCreamDecorator extends CoffeeDecorator {
public WhippedCreamDecorator(Coffee coffee) {
super(coffee);
}
public double getCost() {
return super.getCost() + 0.7;
}
public String getDescription() {
return super.getDescription() + ", with whipped cream";
}
}
|
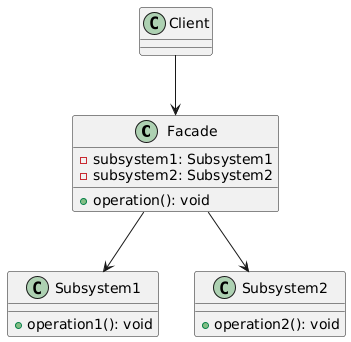
10. 外观模式 (Facade)
概念:为子系统中的一组接口提供一个一致的界面,外观模式定义了一个高层接口,这个接口使得这一子系统更加容易使用。
问题:子系统过于复杂,客户端需要与多个类交互,导致耦合度高。
解决方案:创建外观类,提供简化的接口来访问子系统的功能。
UML图:
实现代码:
1
2
3
4
5
6
7
8
9
10
11
12
13
14
15
16
17
18
19
20
21
22
23
24
25
26
27
28
29
30
31
32
33
34
35
36
37
38
39
40
41
42
43
44
45
46
47
48
49
50
51
52
53
54
55
56
57
58
|
class CPU {
public void freeze() {
System.out.println("CPU freeze");
}
public void jump(long position) {
System.out.println("CPU jump to position: " + position);
}
public void execute() {
System.out.println("CPU execute");
}
}
class Memory {
public void load(long position, byte[] data) {
System.out.println("Memory load at position: " + position);
}
}
class HardDrive {
public byte[] read(long lba, int size) {
System.out.println("HardDrive read LBA: " + lba + ", size: " + size);
return new byte[size];
}
}
class ComputerFacade {
private CPU processor;
private Memory ram;
private HardDrive hd;
private static final long BOOT_ADDRESS = 0x0000;
private static final long BOOT_SECTOR = 0x0000;
private static final int SECTOR_SIZE = 1024;
public ComputerFacade() {
this.processor = new CPU();
this.ram = new Memory();
this.hd = new HardDrive();
}
public void start() {
processor.freeze();
ram.load(BOOT_ADDRESS, hd.read(BOOT_SECTOR, SECTOR_SIZE));
processor.jump(BOOT_ADDRESS);
processor.execute();
}
}
class Client {
public static void main(String[] args) {
ComputerFacade computer = new ComputerFacade();
computer.start();
}
}
|
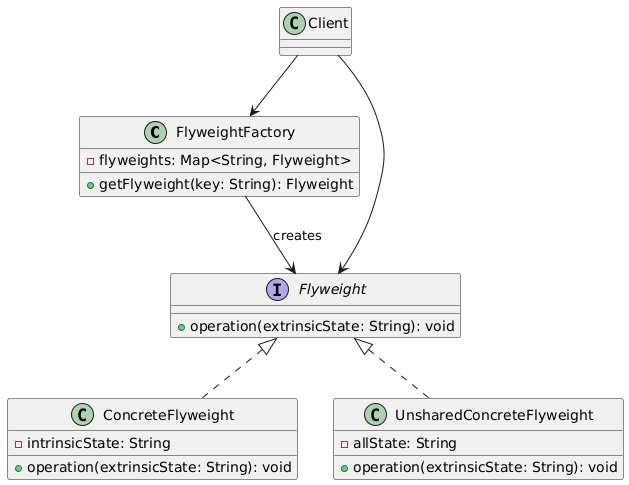
11. 享元模式 (Flyweight)
1
2
3
4
5
6
7
8
9
10
11
12
13
14
15
16
17
18
19
20
21
22
23
24
25
26
27
28
29
30
31
32
33
34
35
36
37
38
39
40
41
42
43
44
45
46
47
48
49
50
51
52
53
54
55
56
57
58
59
60
61
62
63
64
65
66
67
68
69
70
71
72
|
interface Shape {
void draw(int x, int y, String color);
}
class Circle implements Shape {
private String type;
private String color;
public Circle(String color) {
this.type = "Circle";
this.color = color;
}
public void draw(int x, int y, String borderColor) {
System.out.println("Drawing " + type + " of color " + color +
" at (" + x + "," + y + ") with border " + borderColor);
}
}
class ShapeFactory {
private static final Map<String, Shape> circleMap = new HashMap<>();
public static Shape getCircle(String color) {
Circle circle = (Circle) circleMap.get(color);
if (circle == null) {
circle = new Circle(color);
circleMap.put(color, circle);
System.out.println("Creating circle of color: " + color);
}
return circle;
}
public static int getTotalObjects() {
return circleMap.size();
}
}
class FlyweightPatternDemo {
private static final String[] colors = {"Red", "Green", "Blue", "White", "Black"};
public static void main(String[] args) {
for (int i = 0; i < 20; ++i) {
Circle circle = (Circle) ShapeFactory.getCircle(getRandomColor());
circle.draw(getRandomX(), getRandomY(), getRandomBorderColor());
}
System.out.println("Total circle objects created: " +
ShapeFactory.getTotalObjects());
}
private static String getRandomColor() {
return colors[(int)(Math.random() * colors.length)];
}
private static int getRandomX() {
return (int)(Math.random() * 100);
}
private static int getRandomY() {
return (int)(Math.random() * 100);
}
private static String getRandomBorderColor() {
return colors[(int)(Math.random() * colors.length)];
}
}
|
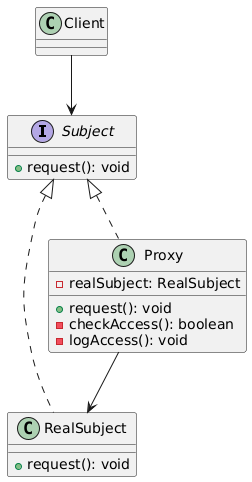
12. 代理模式 (Proxy)
概念:为其他对象提供一种代理以控制对这个对象的访问。
问题:需要控制对某个对象的访问,或者在访问对象时添加额外功能。
解决方案:创建代理类,实现与真实对象相同的接口,并在代理类中控制对真实对象的访问。
UML图:
1
2
3
4
5
6
7
8
9
10
11
12
13
14
15
16
17
18
19
20
21
22
23
24
25
26
27
28
29
30
31
32
33
34
35
36
37
38
39
40
41
42
43
44
45
46
47
48
49
50
51
52
53
54
55
56
57
58
59
60
61
62
63
64
65
66
67
68
69
70
71
72
73
74
75
76
77
78
79
80
81
82
83
84
85
86
87
88
89
90
91
92
93
94
95
96
97
98
99
100
101
102
103
104
105
106
107
108
109
110
111
112
113
114
115
116
117
118
119
120
121
122
123
124
125
126
127
128
129
130
131
132
133
134
|
interface Image {
void display();
String getFileName();
}
class RealImage implements Image {
private String fileName;
public RealImage(String fileName) {
this.fileName = fileName;
loadFromDisk();
}
private void loadFromDisk() {
System.out.println("Loading image: " + fileName);
}
public void display() {
System.out.println("Displaying image: " + fileName);
}
public String getFileName() {
return fileName;
}
}
class ProxyImage implements Image {
private RealImage realImage;
private String fileName;
public ProxyImage(String fileName) {
this.fileName = fileName;
}
public void display() {
if (realImage == null) {
realImage = new RealImage(fileName);
}
realImage.display();
}
public String getFileName() {
return fileName;
}
}
class LazyImageLoader implements Image {
private String fileName;
private RealImage realImage;
public LazyImageLoader(String fileName) {
this.fileName = fileName;
}
public void display() {
if (realImage == null) {
System.out.println("Placeholder for image: " + fileName);
} else {
realImage.display();
}
}
public void load() {
if (realImage == null) {
realImage = new RealImage(fileName);
}
}
public String getFileName() {
return fileName;
}
}
interface ProtectedImage extends Image {
boolean authenticate(String password);
}
class ProtectedRealImage implements ProtectedImage {
private String fileName;
private String password;
public ProtectedRealImage(String fileName, String password) {
this.fileName = fileName;
this.password = password;
}
public void display() {
System.out.println("Displaying protected image: " + fileName);
}
public String getFileName() {
return fileName;
}
public boolean authenticate(String inputPassword) {
return password.equals(inputPassword);
}
}
class ImageProxy implements ProtectedImage {
private ProtectedRealImage realImage;
private String fileName;
public ImageProxy(String fileName) {
this.fileName = fileName;
}
public void display() {
if (realImage != null) {
realImage.display();
} else {
System.out.println("Access denied. Please authenticate first.");
}
}
public boolean authenticate(String password) {
if ("secret".equals(password)) {
realImage = new ProtectedRealImage(fileName, password);
return true;
}
return false;
}
public String getFileName() {
return fileName;
}
}
|
三、行为型模式
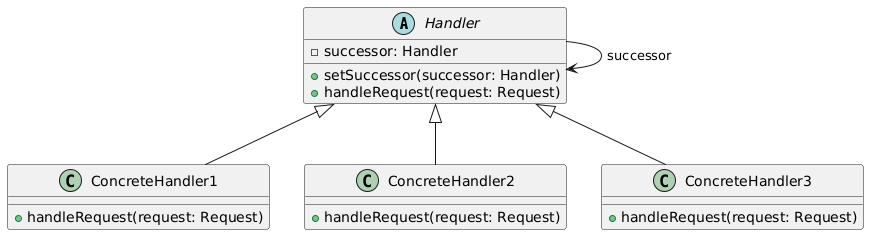
13. 职责链模式 (Chain of Responsibility)
概念:避免请求发送者与接收者耦合在一起,让多个对象都有机会处理请求,将这些对象连成一条链,并沿着这条链传递请求,直到有一个对象处理它为止。
问题:需要让多个对象都有机会处理请求,但不明确指定接收者。
解决方案:创建处理者链,每个处理者决定是否处理请求或传递给下一个处理者。
UML图:
实现代码:
1
2
3
4
5
6
7
8
9
10
11
12
13
14
15
16
17
18
19
20
21
22
23
24
25
26
27
28
29
30
31
32
33
34
35
36
37
38
39
40
41
42
43
44
45
46
47
48
49
50
51
52
53
54
55
56
57
58
59
60
61
62
63
64
65
66
67
68
69
70
71
72
73
74
75
76
77
78
79
80
81
82
|
class PurchaseRequest {
private double amount;
private String purpose;
public PurchaseRequest(double amount, String purpose) {
this.amount = amount;
this.purpose = purpose;
}
public double getAmount() { return amount; }
public String getPurpose() { return purpose; }
}
abstract class Approver {
protected Approver successor;
protected String name;
public Approver(String name) {
this.name = name;
}
public void setSuccessor(Approver successor) {
this.successor = successor;
}
public abstract void processRequest(PurchaseRequest request);
}
class Director extends Approver {
private final double APPROVAL_LIMIT = 10000;
public Director(String name) {
super(name);
}
public void processRequest(PurchaseRequest request) {
if (request.getAmount() < APPROVAL_LIMIT) {
System.out.println("Director " + name + " approved request #" +
request.getAmount() + " for " + request.getPurpose());
} else if (successor != null) {
successor.processRequest(request);
}
}
}
class VicePresident extends Approver {
private final double APPROVAL_LIMIT = 25000;
public VicePresident(String name) {
super(name);
}
public void processRequest(PurchaseRequest request) {
if (request.getAmount() < APPROVAL_LIMIT) {
System.out.println("VicePresident " + name + " approved request #" +
request.getAmount() + " for " + request.getPurpose());
} else if (successor != null) {
successor.processRequest(request);
}
}
}
class President extends Approver {
private final double APPROVAL_LIMIT = 50000;
public President(String name) {
super(name);
}
public void processRequest(PurchaseRequest request) {
if (request.getAmount() < APPROVAL_LIMIT) {
System.out.println("President " + name + " approved request #" +
request.getAmount() + " for " + request.getPurpose());
} else {
System.out.println("Request #" + request.getAmount() +
" requires board meeting approval!");
}
}
}
|
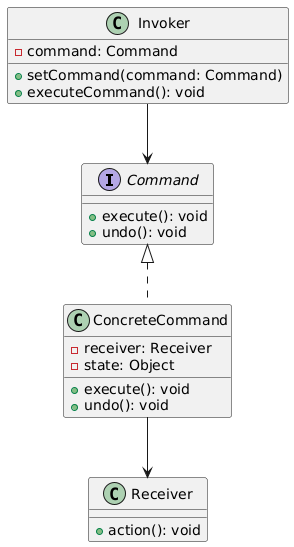
14. 命令模式 (Command)
概念:将一个请求封装为一个对象,从而使你可以用不同的请求对客户进行参数化,对请求排队或记录请求日志,以及支持可撤销的操作。
问题:需要将请求发送者和接收者解耦,支持请求的排队、记录、撤销等操作。
解决方案:将请求封装为命令对象,包含执行操作的所有信息。
UML图:
实现代码:
1
2
3
4
5
6
7
8
9
10
11
12
13
14
15
16
17
18
19
20
21
22
23
24
25
26
27
28
29
30
31
32
33
34
35
36
37
38
39
40
41
42
43
44
45
46
47
48
49
50
51
52
53
54
55
56
57
58
59
60
61
62
63
64
65
66
67
68
69
70
71
72
73
74
75
76
77
78
79
80
81
82
83
84
85
86
87
88
89
90
91
92
93
94
95
96
97
|
class Light {
private String location;
public Light(String location) {
this.location = location;
}
public void on() {
System.out.println(location + " light is ON");
}
public void off() {
System.out.println(location + " light is OFF");
}
}
interface Command {
void execute();
void undo();
}
class LightOnCommand implements Command {
private Light light;
public LightOnCommand(Light light) {
this.light = light;
}
public void execute() {
light.on();
}
public void undo() {
light.off();
}
}
class LightOffCommand implements Command {
private Light light;
public LightOffCommand(Light light) {
this.light = light;
}
public void execute() {
light.off();
}
public void undo() {
light.on();
}
}
class NoCommand implements Command {
public void execute() {}
public void undo() {}
}
class RemoteControl {
private Command[] onCommands;
private Command[] offCommands;
private Command undoCommand;
public RemoteControl() {
onCommands = new Command[7];
offCommands = new Command[7];
undoCommand = new NoCommand();
for (int i = 0; i < 7; i++) {
onCommands[i] = new NoCommand();
offCommands[i] = new NoCommand();
}
}
public void setCommand(int slot, Command onCommand, Command offCommand) {
onCommands[slot] = onCommand;
offCommands[slot] = offCommand;
}
public void onButtonWasPushed(int slot) {
onCommands[slot].execute();
undoCommand = onCommands[slot];
}
public void offButtonWasPushed(int slot) {
offCommands[slot].execute();
undoCommand = offCommands[slot];
}
public void undoButtonWasPushed() {
undoCommand.undo();
}
}
|
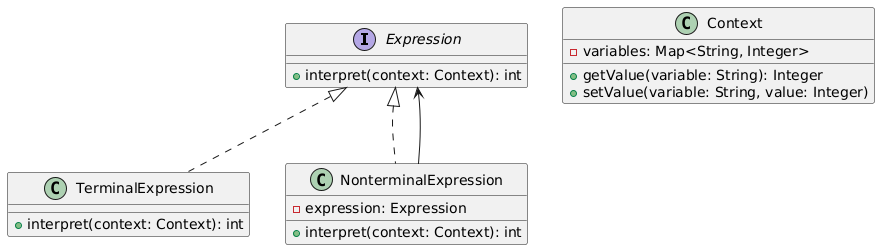
15. 解释器模式 (Interpreter)
1
2
3
4
5
6
7
8
9
10
11
12
13
14
15
16
17
18
19
20
21
22
23
24
25
26
27
28
29
30
31
32
33
34
35
36
37
38
39
40
41
42
43
44
45
46
47
48
49
50
51
52
53
54
55
56
57
58
59
60
61
62
63
64
65
66
67
68
69
70
71
72
73
74
75
76
77
78
79
80
81
82
83
84
85
86
87
88
89
90
91
92
93
94
95
96
97
98
99
100
101
102
103
104
105
106
107
108
109
110
111
112
113
114
115
116
117
118
119
120
121
122
123
124
125
126
127
128
| import java.util.Map;
import java.util.Stack;
import java.util.HashMap;
class Context {
private Map<String, Integer> variables = new HashMap<>();
public void setVariable(String variable, int value) {
variables.put(variable, value);
}
public int getVariable(String variable) {
return variables.getOrDefault(variable, 0);
}
}
interface Expression {
int interpret(Context context);
}
class Variable implements Expression {
private String name;
public Variable(String name) {
this.name = name;
}
public int interpret(Context context) {
return context.getVariable(name);
}
}
class Number implements Expression {
private int number;
public Number(int number) {
this.number = number;
}
public int interpret(Context context) {
return number;
}
}
class Add implements Expression {
private Expression left;
private Expression right;
public Add(Expression left, Expression right) {
this.left = left;
this.right = right;
}
public int interpret(Context context) {
return left.interpret(context) + right.interpret(context);
}
}
class Subtract implements Expression {
private Expression left;
private Expression right;
public Subtract(Expression left, Expression right) {
this.left = left;
this.right = right;
}
public int interpret(Context context) {
return left.interpret(context) - right.interpret(context);
}
}
class Multiply implements Expression {
private Expression left;
private Expression right;
public Multiply(Expression left, Expression right) {
this.left = left;
this.right = right;
}
public int interpret(Context context) {
return left.interpret(context) * right.interpret(context);
}
}
class ExpressionParser {
public static Expression parse(String expression) {
Stack<Expression> stack = new Stack<>();
String[] tokens = expression.split(" ");
for (String token : tokens) {
if (isOperator(token)) {
Expression right = stack.pop();
Expression left = stack.pop();
switch (token) {
case "+":
stack.push(new Add(left, right));
break;
case "-":
stack.push(new Subtract(left, right));
break;
case "*":
stack.push(new Multiply(left, right));
break;
}
} else {
if (Character.isDigit(token.charAt(0))) {
stack.push(new Number(Integer.parseInt(token)));
} else {
stack.push(new Variable(token));
}
}
}
return stack.pop();
}
private static boolean isOperator(String token) {
return token.equals("+") || token.equals("-") || token.equals("*");
}
}
|
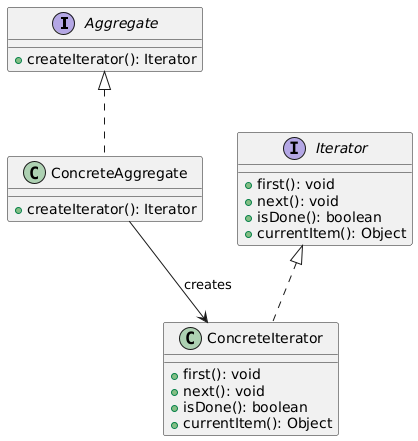
16. 迭代器模式 (Iterator)
1
2
3
4
5
6
7
8
9
10
11
12
13
14
15
16
17
18
19
20
21
22
23
24
25
26
27
28
29
30
31
32
33
34
35
36
37
38
39
40
41
42
43
44
45
46
47
48
49
50
51
52
53
54
55
56
57
58
59
60
61
62
63
64
65
|
interface Iterator<T> {
boolean hasNext();
T next();
void remove();
}
interface Container<T> {
Iterator<T> getIterator();
}
class NameRepository implements Container<String> {
private String[] names = {"Robert", "John", "Julie", "Lora"};
public Iterator<String> getIterator() {
return new NameIterator();
}
private class NameIterator implements Iterator<String> {
int index;
public boolean hasNext() {
return index < names.length;
}
public String next() {
if (hasNext()) {
return names[index++];
}
return null;
}
public void remove() {
throw new UnsupportedOperationException();
}
}
}
class ArrayIterator<T> implements Iterator<T> {
private T[] array;
private int position = 0;
public ArrayIterator(T[] array) {
this.array = array;
}
public boolean hasNext() {
return position < array.length && array[position] != null;
}
public T next() {
if (!hasNext()) {
throw new NoSuchElementException();
}
return array[position++];
}
public void remove() {
throw new UnsupportedOperationException();
}
}
|
1
2
3
4
5
6
7
8
9
10
11
12
13
14
15
16
17
18
19
20
21
22
23
24
25
26
27
28
29
30
31
32
33
34
35
36
37
38
39
40
41
42
43
44
45
46
47
48
49
50
51
52
53
54
55
56
57
58
59
60
61
62
63
64
65
66
67
68
69
70
71
72
|
interface ChatMediator {
void sendMessage(String msg, User user);
void addUser(User user);
}
class ChatRoom implements ChatMediator {
private List<User> users;
public ChatRoom() {
this.users = new ArrayList<>();
}
public void addUser(User user) {
this.users.add(user);
}
public void sendMessage(String msg, User user) {
for (User u : users) {
if (u != user) {
u.receive(msg);
}
}
}
}
abstract class User {
protected ChatMediator mediator;
protected String name;
public User(ChatMediator med, String name) {
this.mediator = med;
this.name = name;
}
public abstract void send(String msg);
public abstract void receive(String msg);
}
class BasicUser extends User {
public BasicUser(ChatMediator med, String name) {
super(med, name);
}
public void send(String msg) {
System.out.println(name + " sends: " + msg);
mediator.sendMessage(msg, this);
}
public void receive(String msg) {
System.out.println(name + " receives: " + msg);
}
}
class PremiumUser extends User {
public PremiumUser(ChatMediator med, String name) {
super(med, name);
}
public void send(String msg) {
System.out.println(name + " sends: " + msg);
mediator.sendMessage(msg, this);
}
public void receive(String msg) {
System.out.println(name + " receives: " + msg);
}
}
|
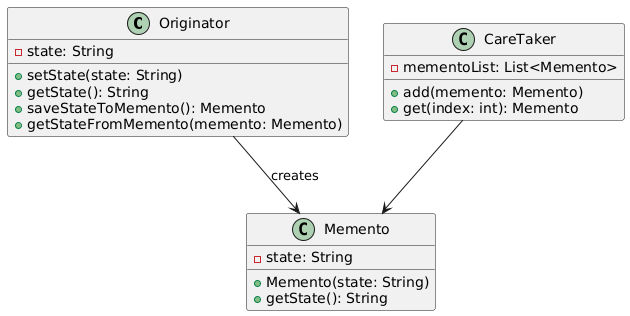
18. 备忘录模式 (Memento)
概念:在不破坏封装性的前提下,捕获一个对象的内部状态,并在该对象之外保存这个状态,以便以后恢复对象到原先保存的状态。
问题:需要保存对象状态并在以后恢复,但不希望暴露对象内部细节。
解决方案:创建备忘录类来保存状态,由原发器管理备忘录。
UML图:
实现代码:
1
2
3
4
5
6
7
8
9
10
11
12
13
14
15
16
17
18
19
20
21
22
23
24
25
26
27
28
29
30
31
32
33
34
35
36
37
38
39
40
41
42
43
44
45
46
47
48
49
50
51
52
53
54
55
56
57
58
59
60
61
62
63
64
65
66
67
68
69
70
71
72
73
74
75
76
77
78
79
80
81
82
83
84
85
86
87
|
class Memento {
private final String state;
public Memento(String state) {
this.state = state;
}
public String getState() {
return state;
}
}
class Originator {
private String state;
public void setState(String state) {
this.state = state;
System.out.println("State set to: " + state);
}
public String getState() {
return state;
}
public Memento saveStateToMemento() {
return new Memento(state);
}
public void getStateFromMemento(Memento memento) {
state = memento.getState();
System.out.println("State restored to: " + state);
}
}
class CareTaker {
private List<Memento> mementoList = new ArrayList<>();
public void add(Memento state) {
mementoList.add(state);
}
public Memento get(int index) {
return mementoList.get(index);
}
public int getSize() {
return mementoList.size();
}
}
class TextEditor {
private StringBuilder text = new StringBuilder();
private TextEditorMemento lastSavedState;
public void write(String text) {
this.text.append(text);
}
public String getText() {
return text.toString();
}
public TextEditorMemento save() {
return new TextEditorMemento(text.toString());
}
public void restore(TextEditorMemento memento) {
text = new StringBuilder(memento.getSavedText());
}
public static class TextEditorMemento {
private final String text;
private TextEditorMemento(String text) {
this.text = text;
}
private String getSavedText() {
return text;
}
}
}
|
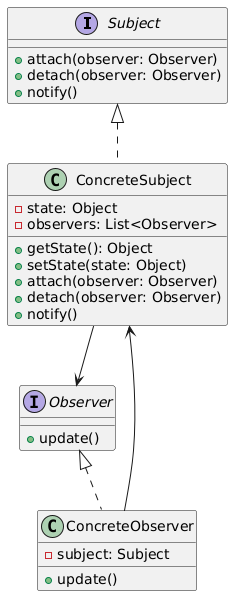
19. 观察者模式 (Observer)
概念:定义对象间的一种一对多的依赖关系,当一个对象的状态发生改变时,所有依赖于它的对象都得到通知并被自动更新。
问题:需要实现对象之间的动态依赖关系,当一个对象状态改变时,其他相关对象能够自动更新。
解决方案:定义主题和观察者接口,主题维护观察者列表并在状态改变时通知它们。
UML图:
实现代码:
1
2
3
4
5
6
7
8
9
10
11
12
13
14
15
16
17
18
19
20
21
22
23
24
25
26
27
28
29
30
31
32
33
34
35
36
37
38
39
40
41
42
43
44
45
46
47
48
49
50
51
52
53
54
55
56
57
58
59
60
61
62
63
64
65
66
67
68
69
70
71
72
73
74
75
76
77
78
79
80
81
82
83
84
85
86
87
88
89
90
91
92
93
94
95
96
97
98
99
100
101
102
103
104
105
106
107
108
109
110
111
112
113
114
115
116
117
118
119
120
121
122
123
124
125
126
127
128
129
130
131
132
133
134
135
136
| import java.util.ArrayList;
import java.util.List;
interface Subject {
void registerObserver(Observer observer);
void removeObserver(Observer observer);
void notifyObservers();
}
interface Observer {
void update(float temperature, float humidity, float pressure);
}
interface DisplayElement {
void display();
}
class WeatherData implements Subject {
private List<Observer> observers;
private float temperature;
private float humidity;
private float pressure;
public WeatherData() {
observers = new ArrayList<>();
}
public void registerObserver(Observer observer) {
observers.add(observer);
}
public void removeObserver(Observer observer) {
observers.remove(observer);
}
public void notifyObservers() {
for (Observer observer : observers) {
observer.update(temperature, humidity, pressure);
}
}
public void measurementsChanged() {
notifyObservers();
}
public void setMeasurements(float temperature, float humidity, float pressure) {
this.temperature = temperature;
this.humidity = humidity;
this.pressure = pressure;
measurementsChanged();
}
}
class CurrentConditionsDisplay implements Observer, DisplayElement {
private float temperature;
private float humidity;
private Subject weatherData;
public CurrentConditionsDisplay(Subject weatherData) {
this.weatherData = weatherData;
weatherData.registerObserver(this);
}
public void update(float temperature, float humidity, float pressure) {
this.temperature = temperature;
this.humidity = humidity;
display();
}
public void display() {
System.out.println("Current conditions: " + temperature +
"°C and " + humidity + "% humidity");
}
}
class StatisticsDisplay implements Observer, DisplayElement {
private float maxTemp = 0.0f;
private float minTemp = 200;
private float tempSum = 0.0f;
private int numReadings;
public StatisticsDisplay(Subject weatherData) {
weatherData.registerObserver(this);
}
public void update(float temperature, float humidity, float pressure) {
tempSum += temperature;
numReadings++;
if (temperature > maxTemp) {
maxTemp = temperature;
}
if (temperature < minTemp) {
minTemp = temperature;
}
display();
}
public void display() {
System.out.println("Avg/Max/Min temperature = " + (tempSum / numReadings) +
"/" + maxTemp + "/" + minTemp);
}
}
import java.util.Observable;
import java.util.Observer;
class WeatherDataObservable extends Observable {
private float temperature;
private float humidity;
private float pressure;
public void measurementsChanged() {
setChanged();
notifyObservers();
}
public void setMeasurements(float temperature, float humidity, float pressure) {
this.temperature = temperature;
this.humidity = humidity;
this.pressure = pressure;
measurementsChanged();
}
public float getTemperature() { return temperature; }
public float getHumidity() { return humidity; }
public float getPressure() { return pressure; }
}
|
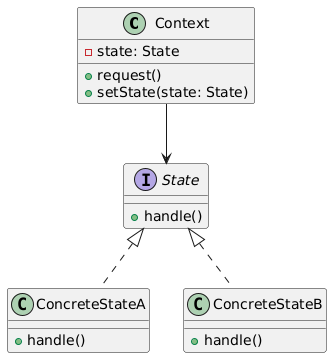
20. 状态模式 (State)
概念:允许一个对象在其内部状态改变时改变它的行为,对象看起来似乎修改了它的类。
问题:对象的行为依赖于它的状态,并且必须在运行时根据状态改变行为。
解决方案:将状态封装为独立的类,并将行为委托给当前状态对象。
UML图:
实现代码:
1
2
3
4
5
6
7
8
9
10
11
12
13
14
15
16
17
18
19
20
21
22
23
24
25
26
27
28
29
30
31
32
33
34
35
36
37
38
39
40
41
42
43
44
45
46
47
48
49
50
51
52
53
54
55
56
57
58
59
60
61
62
63
64
65
66
67
68
69
70
71
72
73
74
75
76
77
78
79
80
81
82
83
84
85
86
87
88
89
90
91
92
93
94
95
96
97
98
99
100
101
102
103
104
105
106
107
108
109
110
111
112
113
114
115
116
117
118
119
120
121
122
123
124
125
126
127
128
129
130
131
132
133
134
135
136
137
138
139
140
141
142
143
144
145
146
|
interface State {
void insertQuarter();
void ejectQuarter();
void turnCrank();
void dispense();
}
class NoQuarterState implements State {
private GumballMachine gumballMachine;
public NoQuarterState(GumballMachine gumballMachine) {
this.gumballMachine = gumballMachine;
}
public void insertQuarter() {
System.out.println("You inserted a quarter");
gumballMachine.setState(gumballMachine.getHasQuarterState());
}
public void ejectQuarter() {
System.out.println("You haven't inserted a quarter");
}
public void turnCrank() {
System.out.println("You turned, but there's no quarter");
}
public void dispense() {
System.out.println("You need to pay first");
}
}
class HasQuarterState implements State {
private GumballMachine gumballMachine;
public HasQuarterState(GumballMachine gumballMachine) {
this.gumballMachine = gumballMachine;
}
public void insertQuarter() {
System.out.println("You can't insert another quarter");
}
public void ejectQuarter() {
System.out.println("Quarter returned");
gumballMachine.setState(gumballMachine.getNoQuarterState());
}
public void turnCrank() {
System.out.println("You turned...");
gumballMachine.setState(gumballMachine.getSoldState());
}
public void dispense() {
System.out.println("No gumball dispensed");
}
}
class SoldState implements State {
private GumballMachine gumballMachine;
public SoldState(GumballMachine gumballMachine) {
this.gumballMachine = gumballMachine;
}
public void insertQuarter() {
System.out.println("Please wait, we're already giving you a gumball");
}
public void ejectQuarter() {
System.out.println("Sorry, you already turned the crank");
}
public void turnCrank() {
System.out.println("Turning twice doesn't get you another gumball!");
}
public void dispense() {
gumballMachine.releaseBall();
if (gumballMachine.getCount() > 0) {
gumballMachine.setState(gumballMachine.getNoQuarterState());
} else {
System.out.println("Oops, out of gumballs!");
gumballMachine.setState(gumballMachine.getSoldOutState());
}
}
}
class GumballMachine {
private State soldOutState;
private State noQuarterState;
private State hasQuarterState;
private State soldState;
private State state;
private int count = 0;
public GumballMachine(int numberGumballs) {
soldOutState = new SoldOutState(this);
noQuarterState = new NoQuarterState(this);
hasQuarterState = new HasQuarterState(this);
soldState = new SoldState(this);
this.count = numberGumballs;
if (numberGumballs > 0) {
state = noQuarterState;
} else {
state = soldOutState;
}
}
public void insertQuarter() {
state.insertQuarter();
}
public void ejectQuarter() {
state.ejectQuarter();
}
public void turnCrank() {
state.turnCrank();
state.dispense();
}
void releaseBall() {
System.out.println("A gumball comes rolling out the slot...");
if (count != 0) {
count = count - 1;
}
}
public State getSoldOutState() { return soldOutState; }
public State getNoQuarterState() { return noQuarterState; }
public State getHasQuarterState() { return hasQuarterState; }
public State getSoldState() { return soldState; }
public void setState(State state) {
this.state = state;
}
public int getCount() { return count; }
}
|
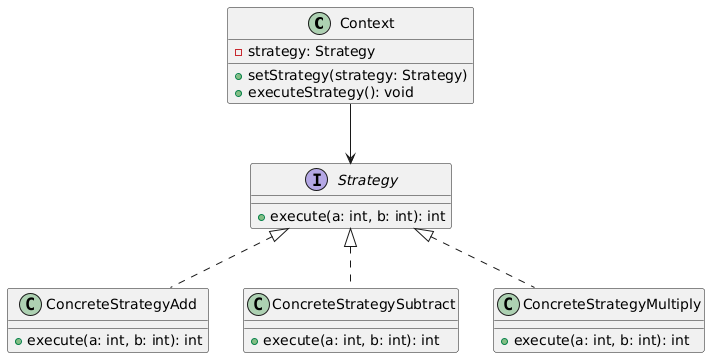
21. 策略模式 (Strategy)
1
2
3
4
5
6
7
8
9
10
11
12
13
14
15
16
17
18
19
20
21
22
23
24
25
26
27
28
29
30
31
32
33
34
35
36
37
38
39
40
41
42
43
44
45
46
47
48
49
50
51
52
53
54
55
56
57
58
59
60
61
62
63
64
65
66
67
68
69
70
71
72
73
74
75
76
77
78
79
80
81
82
83
84
85
86
87
88
89
90
91
92
93
94
95
96
97
98
99
100
101
102
103
104
105
106
107
108
109
110
111
112
113
114
115
116
117
118
119
120
121
122
123
124
125
126
127
128
129
130
|
interface PaymentStrategy {
void pay(int amount);
}
class CreditCardStrategy implements PaymentStrategy {
private String name;
private String cardNumber;
private String cvv;
private String dateOfExpiry;
public CreditCardStrategy(String name, String cardNumber, String cvv, String dateOfExpiry) {
this.name = name;
this.cardNumber = cardNumber;
this.cvv = cvv;
this.dateOfExpiry = dateOfExpiry;
}
public void pay(int amount) {
System.out.println(amount + " paid with credit/debit card");
}
}
class PayPalStrategy implements PaymentStrategy {
private String emailId;
private String password;
public PayPalStrategy(String emailId, String password) {
this.emailId = emailId;
this.password = password;
}
public void pay(int amount) {
System.out.println(amount + " paid using PayPal");
}
}
class CryptoStrategy implements PaymentStrategy {
private String walletAddress;
public CryptoStrategy(String walletAddress) {
this.walletAddress = walletAddress;
}
public void pay(int amount) {
System.out.println(amount + " paid with cryptocurrency");
}
}
class ShoppingCart {
private List<Item> items;
public ShoppingCart() {
this.items = new ArrayList<>();
}
public void addItem(Item item) {
items.add(item);
}
public void removeItem(Item item) {
items.remove(item);
}
public int calculateTotal() {
int sum = 0;
for (Item item : items) {
sum += item.getPrice();
}
return sum;
}
public void pay(PaymentStrategy paymentMethod) {
int amount = calculateTotal();
paymentMethod.pay(amount);
}
}
class Item {
private String upcCode;
private int price;
public Item(String upcCode, int price) {
this.upcCode = upcCode;
this.price = price;
}
public String getUpcCode() { return upcCode; }
public int getPrice() { return price; }
}
interface SortStrategy {
void sort(int[] array);
}
class BubbleSortStrategy implements SortStrategy {
public void sort(int[] array) {
System.out.println("Sorting using bubble sort");
}
}
class QuickSortStrategy implements SortStrategy {
public void sort(int[] array) {
System.out.println("Sorting using quick sort");
}
}
class MergeSortStrategy implements SortStrategy {
public void sort(int[] array) {
System.out.println("Sorting using merge sort");
}
}
class Sorter {
private SortStrategy strategy;
public void setStrategy(SortStrategy strategy) {
this.strategy = strategy;
}
public void sortArray(int[] array) {
strategy.sort(array);
}
}
|
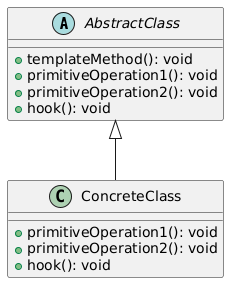
22. 模板方法模式 (Template Method)
概念:定义一个操作中的算法的骨架,而将一些步骤延迟到子类中。模板方法使得子类可以不改变一个算法的结构即可重定义该算法的某些特定步骤。
问题:有多个类包含相同的算法,但某些步骤的实现不同。
解决方案:在抽象类中定义模板方法,将可变步骤声明为抽象方法。
UML图:
实现代码:
1
2
3
4
5
6
7
8
9
10
11
12
13
14
15
16
17
18
19
20
21
22
23
24
25
26
27
28
29
30
31
32
33
34
35
36
37
38
39
40
41
42
43
44
45
46
47
48
49
50
51
52
53
54
55
56
57
58
59
60
61
62
63
64
65
66
67
68
69
70
71
72
73
74
75
76
77
78
79
80
81
82
83
84
85
86
87
88
89
90
91
92
93
94
95
96
97
98
99
100
101
102
103
104
105
106
107
108
109
110
111
112
113
114
115
116
117
118
|
abstract class DataProcessor {
public final void process() {
readData();
processData();
writeData();
if (needValidation()) {
validateData();
}
}
private void readData() {
System.out.println("Reading data from source...");
}
private void writeData() {
System.out.println("Writing data to destination...");
}
protected abstract void processData();
protected boolean needValidation() {
return false;
}
protected void validateData() {
System.out.println("Validating data...");
}
}
class CSVDataProcessor extends DataProcessor {
protected void processData() {
System.out.println("Processing CSV data...");
}
protected boolean needValidation() {
return true;
}
protected void validateData() {
System.out.println("Validating CSV data format...");
}
}
class XMLDataProcessor extends DataProcessor {
protected void processData() {
System.out.println("Processing XML data...");
}
}
class JSONDataProcessor extends DataProcessor {
protected void processData() {
System.out.println("Processing JSON data...");
}
protected boolean needValidation() {
return true;
}
}
abstract class Beverage {
public final void prepareRecipe() {
boilWater();
brew();
pourInCup();
if (customerWantsCondiments()) {
addCondiments();
}
}
protected abstract void brew();
protected abstract void addCondiments();
protected void boilWater() {
System.out.println("Boiling water");
}
protected void pourInCup() {
System.out.println("Pouring into cup");
}
protected boolean customerWantsCondiments() {
return true;
}
}
class Coffee extends Beverage {
protected void brew() {
System.out.println("Dripping coffee through filter");
}
protected void addCondiments() {
System.out.println("Adding sugar and milk");
}
protected boolean customerWantsCondiments() {
return true;
}
}
class Tea extends Beverage {
protected void brew() {
System.out.println("Steeping the tea");
}
protected void addCondiments() {
System.out.println("Adding lemon");
}
}
|
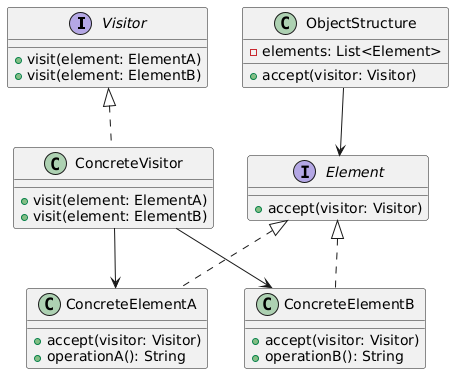
23. 访问者模式 (Visitor)
概念:表示一个作用于某对象结构中的各元素的操作。它使你可以在不改变各元素的类的前提下定义作用于这些元素的新操作。
问题:需要在不同对象上执行不同的操作,但不希望修改这些对象的类。
解决方案:将操作封装在访问者对象中,对象接受访问者并调用相应方法。
UML图:
实现代码:
1
2
3
4
5
6
7
8
9
10
11
12
13
14
15
16
17
18
19
20
21
22
23
24
25
26
27
28
29
30
31
32
33
34
35
36
37
38
39
40
41
42
43
44
45
46
47
48
49
50
51
52
53
54
55
56
57
58
59
60
61
62
63
64
65
66
67
68
69
70
71
72
73
74
75
76
77
78
79
80
81
82
83
84
85
86
87
88
89
90
91
92
93
94
95
96
97
98
99
100
101
102
103
104
105
106
107
108
109
110
111
112
113
114
115
116
117
118
119
120
121
122
123
124
125
126
127
128
129
130
131
| import java.util.ArrayList;
import java.util.List;
interface ComputerPart {
void accept(ComputerPartVisitor visitor);
}
class Keyboard implements ComputerPart {
public void accept(ComputerPartVisitor visitor) {
visitor.visit(this);
}
public String operation() {
return "Keyboard";
}
}
class Monitor implements ComputerPart {
public void accept(ComputerPartVisitor visitor) {
visitor.visit(this);
}
public String operation() {
return "Monitor";
}
}
class Mouse implements ComputerPart {
public void accept(ComputerPartVisitor visitor) {
visitor.visit(this);
}
public String operation() {
return "Mouse";
}
}
class Computer implements ComputerPart {
private List<ComputerPart> parts;
public Computer() {
parts = new ArrayList<>();
parts.add(new Mouse());
parts.add(new Keyboard());
parts.add(new Monitor());
}
public void accept(ComputerPartVisitor visitor) {
for (ComputerPart part : parts) {
part.accept(visitor);
}
visitor.visit(this);
}
}
interface ComputerPartVisitor {
void visit(Computer computer);
void visit(Mouse mouse);
void visit(Keyboard keyboard);
void visit(Monitor monitor);
}
class ComputerPartDisplayVisitor implements ComputerPartVisitor {
public void visit(Computer computer) {
System.out.println("Displaying Computer");
}
public void visit(Mouse mouse) {
System.out.println("Displaying Mouse");
}
public void visit(Keyboard keyboard) {
System.out.println("Displaying Keyboard");
}
public void visit(Monitor monitor) {
System.out.println("Displaying Monitor");
}
}
class ComputerPartMaintenanceVisitor implements ComputerPartVisitor {
public void visit(Computer computer) {
System.out.println("Maintaining Computer");
}
public void visit(Mouse mouse) {
System.out.println("Cleaning Mouse");
}
public void visit(Keyboard keyboard) {
System.out.println("Cleaning Keyboard");
}
public void visit(Monitor monitor) {
System.out.println("Calibrating Monitor");
}
}
class ObjectStructure {
private List<ComputerPart> parts = new ArrayList<>();
public void addPart(ComputerPart part) {
parts.add(part);
}
public void accept(ComputerPartVisitor visitor) {
for (ComputerPart part : parts) {
part.accept(visitor);
}
}
}
public class VisitorPatternDemo {
public static void main(String[] args) {
Computer computer = new Computer();
ComputerPartVisitor displayVisitor = new ComputerPartDisplayVisitor();
ComputerPartVisitor maintenanceVisitor = new ComputerPartMaintenanceVisitor();
System.out.println("=== Displaying Computer Parts ===");
computer.accept(displayVisitor);
System.out.println("\n=== Maintaining Computer Parts ===");
computer.accept(maintenanceVisitor);
}
}
|
总结
GoF的23种设计模式为我们提供了解决常见软件设计问题的经典方案。通过合理运用这些模式,我们可以:
- 提高代码的可维护性和可扩展性
- 降低模块间的耦合度
- 增强代码的复用性
- 使系统更加灵活和易于理解
每种模式都有其适用的场景,在实际开发中应该根据具体需求选择合适的设计模式,而不是为了使用模式而使用模式。希望这篇博客能帮助您更好地理解和应用这些经典的设计模式。